4 min | security
Vaultwarden on Docker with Caddy and Cloudflare

Tired of those VC-backed companies screwing with your password manager? In this post we are going to self-host Vaultwarden on a local server using Caddy as a reverse proxy and Clouflare for DNS. All of this privately available on the local network and secured by an auto-provisioned Let's Encrypt certificate.
This guide assumes you have the following:
- A local server running docker and docker-compose
- A Cloudflare account with a domain associated with it
Let’s get started by setting up the Cloudflare account. We are going to need an API Token, that Caddy will use to manage the DNS, and a CNAME record for a subdomain.
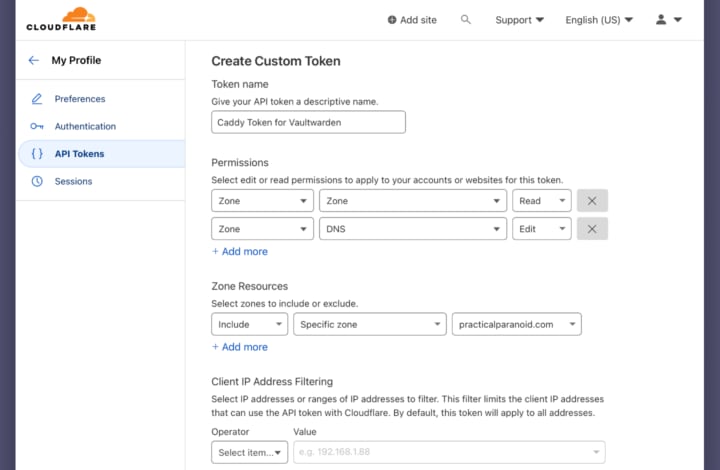
In your Cloudflare profile, go to API Tokens and create a new token. On the next page select custom token and assign it a descriptive name.
We will need two sets of permissions, Zone/Zone/Read and Zone/DNS/Edit to allow Caddy to read and update the DNS record.
It’s good practice to limit access of the token to only the domain we are going to use. We can do this in Zone Resources by selecting Include/Specific zone and then our domain.
Once the token is generated, make sure you copy it somewhere as we will need it later.
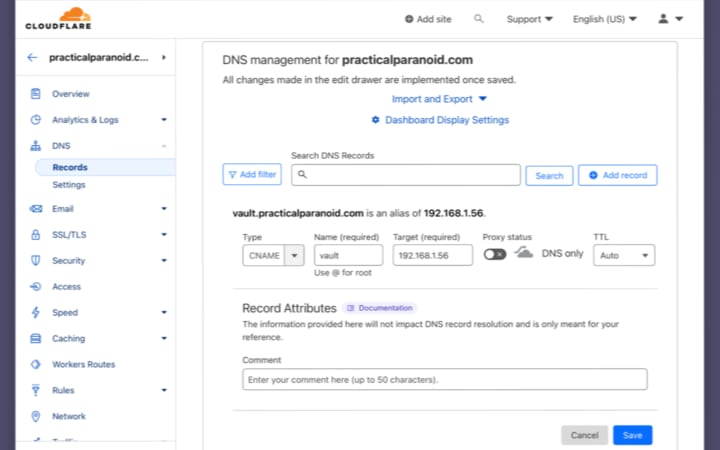
Time to head over to the domain dns records and setting up a CNAME, we will call it vault and point it to our server private IP address (for instance 192.168.1.56).
The set up on Cloudflare is now complete.
On the server, let’s create the folders and files we are going to need:
mkdir -p ~/.vaultwarden/containers_data/{caddy,server}
mkdir -p ~/.vaultwarden/containers_data/caddy/{config,data}
mkdir -p ~/.vaultwarden/containers_data/server/{data}

cd ~/.vaultwarden
touch docker-compose.yml
touch variables.env
touch Dockerfile
touch Caddyfile
A brief explaination of structure above (in order):
- We will be storing everything in ~/.vaultwarden and we will be mounting the folders in containers_data inside our containers to persist data
- The docker-compose.yml file will contain both the Caddy and Vaultwarden containers
- The variables.env file will include any environment variable used to configure Vaultwarden
- As we require the Cloudflare module for Caddy we will need to build our Caddy container manually using the Dockerfile
- Finally the Caddyfile is used to configure Caddy, which is our reverse proxy
Let’s start with the docker-compose.yml file:
version: "3"
services:
  caddy:
    build:
      context: .
    container_name: vaultwarden_caddy
    restart: unless-stopped
    user: 1000:1000
    ports:
      - 443:443/tcp
    volumes:
      - ./Caddyfile:/etc/caddy/Caddyfile
      - ~/.vaultwarden/containers_data/caddy/config:/config
      - ~/.vaultwarden/containers_data/caddy/data:/data
  vaultwarden:
    container_name: vaultwarden_server
    image: vaultwarden/server:latest
    restart: unless-stopped
    user: 1000:1000
    env_file: variables.env
    ports:
      - 8080:80/tcp
    volumes:
      - ~/.vaultwarden/containers_data/server/data:/data
Few points to note here:
- We are using the user and group of the local user on the server
- We are mapping port 8080 to the port 80 inside the container, we will reference this port in our Caddyfile
Time to edit the variables.env file:
# replace with your domain
DOMAIN=https://vault.example.com

# port used by the local web server
ROCKET_PORT=8080

# rate limiting settings
LOGIN_RATELIMIT_MAX_BURST=5
LOGIN_RATELIMIT_SECONDS=60
ADMIN_RATELIMIT_MAX_BURST=5
ADMIN_RATELIMIT_SECONDS=60

# to generate an argon2 hash of the admin token using a temporary container run:
# docker run --rm -it vaultwarden/server /vaultwarden hash

# if ADMIN_TOKEN is commented out then admin access is disabled
# you should consider commenting this out when not needed
ADMIN_TOKEN=<REPLACE-WITH-GENERATED-HASH>

# misc settings
EMERGENCY_ACCESS_ALLOWED=true
INVITATIONS_ALLOWED=false
SENDS_ALLOWED=false
SHOW_PASSWORD_HINT=false
SIGNUPS_ALLOWED=false
WEB_VAULT_ENABLED=true
SIGNUPS_VERIFY=true
SIGNUPS_VERIFY_RESEND_TIME=3600
SIGNUPS_VERIFY_RESEND_LIMIT=5

# add domains you want to whitelist for sign up
SIGNUPS_DOMAINS_WHITELIST=example.com,example-1.com

# smtp details to receive verification emails and alerts
# make sure you tweak the security, auth and port
# to reflect your email provider set up
SMTP_HOST=<REPLACE-WITH-HOSTNAME>
SMTP_FROM=<REPLACE-WITH-EMAIL>
SMTP_FROM_NAME=Vaultwarden
SMTP_SECURITY=starttls
SMTP_PORT=587
SMTP_USERNAME=<REPLACE-WITH-EMAIL>
SMTP_PASSWORD=<REPLACE-WITH-PASSWORD>
SMTP_AUTH_MECHANISM=Plain
Time to edit the Dockerfile:
FROM caddy:builder AS builder
RUN caddy-builder github.com/caddy-dns/cloudflare
FROM caddy:latest
COPY --from=builder /usr/bin/caddy /usr/bin/caddy
We are using the Caddy builder container to compile the Cloudflare module and then generate our final container from it.
Lastly we need to edit the Caddyfile:
vault.example.com:443 {
    reverse_proxy vaultwarden_server:8080
    tls {
        dns cloudflare <REPLACE-WITH-CLOUDFLARE-API-TOKEN>
    }
}
The reverse proxy will bind to port 443 and redirect the requests to our Vaultwarden container on port 8080. Remember tweak the domain and add your Cloudflare API Token here.
Last step is to fire up the containers:
cd ~/.vaultwarden

# start the containers
docker-compose up -d

# you can monitor logs to check everything is fine
docker logs vaultwarden_caddy -f
docker logs vaultwarden_server -f
That’s all folks 🙌 if everything worked correctly Caddy will provision an SSL certificate using Let’s Encrypt and your Vaultwarden instance will be accessible at https://vault.example.com from your local network.
Time to create a vault and download the Bitwarden apps.
And don’t forget about ditching your old password manager 😜